Tuesday 31 May 2011

To doodle or not to doodle

Hi. In my journal post I mentioned that I'd used waste from cutting out shapes on my page but didn't actually explain how so let me put that right. If you feel nervous about doodling on a page then this idea might just help.
I created this bee by using the waste from the cut out as a template and stencilled the bee shape with some shimmering watercolour paint. When it was dry I traced the outline with a black pen.
I used the detail on the actual cutout as a guide of the other details to add to my sketch. If you don't have a digital cutter then you might own a die cut machine like the one I used to cut out these flower shapes from some grungepaper.
You can see from the paint around them that I've already used them as a stencil on another project but because the grungepaper is fairly sturdy they make a great template to draw around and that's what I did here with some doodled flowers.
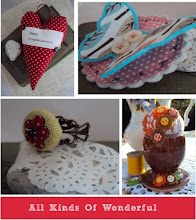
Another idea for using cut out waste is to use it as a negative image as I've done here with the birds sat on a line.

I think sometimes to make the best of any cut out shape you have to get a bit creative.

This angel wing appears on a card I was asked to make but I wasn't quite sure how to feature the double wing shape. So after I'd opened up the software I got rid of the cut out parts on one side of the wing and cut it out. I added a tiny bit of glitter and folded the solid part of the wing behind the cut out part to give it a bit of dimension. Although this is on a card it would look brilliant on a journal page.

I hope I've given a few ideas I have to say I now love doodling. I'll be back soon to share some of my journal pages that I had a lot of fun creating over the weekend.

Happy Creating.

Sunday 29 May 2011

Inspiration Journal

Hi. Have you seen Donna Downey's inspiration journals? I saw them for the first time while watching one of the She Had Three Hearts videos and had to go and find out more. They really appealed, paper and fabric in one journal what more could a girl want?

So imagine how pleased I was to find that the video tutorial for making one of your own was on sale. My excitement was contained just long enough to download the tutorial and within minutes I was watching the simple instructions. You don't need to be an expert sewer by any means but you do need a sewing machine and be able to wield a hammer (Darn those eyelets!)

I have certainly got my moneys worth from this green spotty fabric I bought it as an offcut and have lost count of the amount of projects I've used it for. It's a Mary Engelbreit one for Moda. The button is covered in Amy Butler fabric and the inside of the journal is natural canvas.
I used a selection of different papers for my pages which are mainly 12"x9" with some inclusions of tags, record cards, postcard.

And here is my first page.......
Inspiration: the fusion of intellectual and emotional activity which control one's creative

I've realised that once I've cut shapes out using my Silhouette the waste make brilliant templates.

If you would like to make your own inspiration journal the video workshop is currently $10 for which I paid a little over £6.

I'm hoping to add more to my inspiration journal soon.

Friday 27 May 2011

Art Journal

Whilst I'm not a die hard art journaller I do love having a dabble now and again and Christy Tomlinson's new She Had Three Hearts workshop seemed too good to miss. If you took her She Art Workshop like me you'll know what I mean. Lots of ideas, lots of techniques and generally having fun and getting messy. 

Journaling reads - Sometimes it probably seems like I only wear black but I *heart* colour

This background was created using paint and the large roses are stamped with black ink with extra colour added with paint. The heart is a fabric scrap that I mod podged in place.


This page records my frustrations at finding shoes but my joy this week at actually finding some that fit. For this page I used a book page as the base and built it up with paint, an image from a magazine, stamps, canvas flowers and an offcut journaling block. I sprinkled some mica and then it occurred it was like gold dust, just like the right size shoes.

Most of my art journaling seems to be fun stuff and as the workshop moves on I'm not sure that it will be for me as I don't really do deep and meaningful. I don't know why I just don't/can't/won't.

Someone who does write such brilliant journaling is Alexa and today she has a post featuring some beautiful words and she asks the question 'is it art journaling without the art?' Well I for one think her work is art. Of me you could ask is it art journaling without the journaling? ;-)

The techniques I learnt on the She Art workshop seem to have rubbed off in other areas of creating. This is my brother's birthday card.
I bought a pad of inexpensive canvas and it's perfect for making painted backgrounds for cards.
To this one I added a twill label that I stamped with a sentiment and a canvas flower that I die cut.

......and by the way can anyone enlighten me I always want to write 'journalling' but often see it as 'journaling'. Is it because that's an American way of spelling it? It's been bugging me. I can see another art journal page coming on.

Sunday 22 May 2011

Scrappy Cushion

What do you do with fabric scraps? If you're anything like me you can't bear to throw them away but what can you make from them? Is holding on to them really a practical idea? Well yes is the answer I pleased to say.

I happened upon this tutorial from Cluck Cluck Sew for a Sprocket Pillow. You need only the smallest amount of fabric to cut the pieces. You might recognise some of those above from the bags I made. They are super easy to make and the tutorial does come with the warning that they are addictive and you'll find it hard to just make the one.

Welcome to my new obsession.

I love to combine my different crafty interests together in projects so I took the idea for the cushion a step further and decorated the inexpensive white fabric with some stamped designs. I used my favourite butterfly stamp, a new Kaisercraft grid and some bunting that came free with a magazine.
To stamp my designs I used a Versacraft fabric ink pad in black. All you need to do is heat set the design using an iron - simple.

Tip - Learning from the first one I made I marked where the centre of the back piece of fabric was so that it made it much easier to centre when sewing the button in place threading through to the back.

Some more ideas........

How about transferring a favourite photo or part of it on the plain sections.

Handstamping a message or sentiment for a special gift

Adding names, dates etc

Using up fabric remnants to match a quilt

Recycling a favourite item of clothing

........Go hunt out those scraps.

Thursday 19 May 2011

A Creative Weekend

Last weekend was spent here at this years Scrap-a-Mia. A full weekend (very full) of creating. There was much inking, sticking and cutting going on.
First class to get messy in was Dina Wakely's - Curly Wurlys included. A crafter needs to keep her energy levels up
I used photos from my 40th birthday last year to make a canvas bunting album
Some of Dina's fabulous stencil and mask collection. I'm on the hunt for plastic doilies now. 
Snapped mid cut by Sonja during Michelle's class I think we were laughing at how tall Michelle is and how short I am :-)


Two layouts I made with Webster's Pages designed and taught by Emma Trout. I also made a cute minibook in Celine Navarro's class. She had some of her work with her and her ideas for minibooks are really different.

I can't believe that a week has nearly passed since I set off to pick Sonja up from the airport and we had a leisurely stroll along the prom in the sunshine.

Here's to blog friendships


Tuesday 10 May 2011

Get Knitted

So, I finally scrapped - hurray. I'd been wanting to scrap this photo for a while and I thought it would look good with my texture tuesday photo from last week. The colour scheme of pink and orange is a bit unusual and not something I would probably have chosen. The papers came in a bargain kit I picked up from.........yes you've guessed it, TK Maxx for £2.00. It also gave me a good opportunity to use some orange glittery alphas that at some point I obviously thought it was a good idea to buy. Why? I can't decide whether my layout looks bright and summery or just plain gaudy but at least it sees a return to scrapping and that can't be bad.

If you're wondering about the photo it's me aged 17, knitting while sitting under a hairdryer getting ready for a night out - like you do! And yes my hair was red and blonde I was obviously struggling against it's natural state of straight and brown to make it blonde and curly.

And please don't say I didn't warn you but my new addiction is making napkin flowers.
Now perched on my kitchen window sill.....

.............And through the round window.

The male of the household is hoping that I move on to a new addiction some time soon.

Sunday 8 May 2011

I made things

So after my last post I did it - I made things. 
 A pretty napkin flower which fills my wooden bowl. If you love flowers and blooms and the bigger the better then go and check these beautiful ideas at Made perfect if you're planning a wedding or summer party. My flower is made using the wallflower tutorial. I can see them springing up (or should that be blooming) all over my house.

I always have cards to make and this one was inspired by a design featured in the May edition of Craft Stamper magazine using the free stamp. I'd made the background some time ago and thought it would make a good background the balloon. I think I might some more backgrounds ready to go for when I'm stuck for an idea. This one is a mixture of book pages and stamped images all torn and stuck to a cardstock square before being gessoed.
Next week I'm off to Scrap-a-mia, am I excited? Just a little bit, not least because I get to see Sonja and Michelle. Everyone gets sent a die cut shape to make into a name badge. Mine just happened to be cut from canvas ideal for the addition of felt onto which I handstitched my name and added a bit of stitching around the edge. If you're wondering what the crushed olive reference is that's the group I've been put in, just so I don't forget. I wanted to try and fit some paper flowers on and they do - just. I found some felted balls that I'd made and added some seed beads to them and finally a couple of beeswax butterflies.

This week I was enticed into buying a chipboard spools kit from 3D Jean I love all things sewing related so I have a few ideas rattling around my head of how to use them. I couldn't wait to crack them open and this is my first one. The little stamped doll is part of a larger stamp that also came from 3D Jean but sold out pretty quick. I bought the large button recently from a local shop where the shop owner said he really didn't know what people were going to do with them as when he ordered them he had no idea they would be so large. I could barely contain my excitement at finding it and am kicking myself now for only buying the one ( I need a return visit). What am I going to do with it? It's going to be a brooch.

And lastly I found this book in a local second hand bookshop.
Weirdly, or maybe not so weirdly as it was published in the 70's I think I made something from this book when I was at Junior School. It has perfect patterns (and some not so perfect very non PC) to make using felt and I am in the process of making a cat although as it's made from green felt looks a little more like Kermit at the moment. I'll let you know how it turns out I'm hoping it becomes a bit more cat like.

Tuesday 3 May 2011

Get Excited

It's Texture Tuesday over at Kim Klassen Cafe and this week the challenge is to use at least one texture layer added to a coffee or teacup photo.

Well, I'm a coffee kind of girl and one of my best friends gave me this cup which I thought would look great photographed together with some of my vintage cotton reels.
Soft light layer added with Portrait texture courtesy of Kim Klassen Cafe

So what are you waiting for? Get excited and make things..........

Monday 2 May 2011

Hang Out the Bunting

Hi I hope you've been enjoying all the celebrations I have :-) Bunting seems to have been everywhere and over at Chicken Soup this weeks inspiration also features bunting. I needed to make a birthday card so I thought that maybe a bit of birthday bunting was called for. It also tied in nicely with the cute Prima stamp that I wanted to use.
I hand cut and stamped all the bunting and created the sandy beach from torn coordination card.

I've also been doing a bit of sewing. Do you remember Stanley? I made him back in March and since then really enjoyed sewing with felt. I've been on the look out for more small projects to work on and there are some really wonderful creations at Nuno Life. I have attempted a couple of tiny cats and the reindeer are on my list of things to do.

Yesterday I was looking at a toymaking book I have from the 70s and all the patterns are printed on squared paper for you to scale up and transfer the pattern yourself. Could I adapt them to make a felt creation? Well there was only one way to find out........
You can tell just how tiny he is compared to the bucket which also features in the card photo. He measures just 5cm high. I need to see what else is in that book - Happy Crafting.